Monday, August 6, 2018

Alexander the Great - DBA Armies

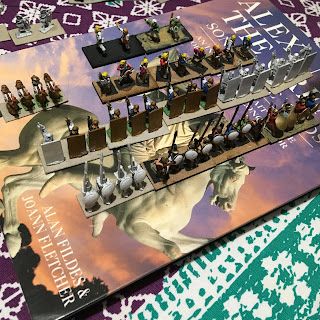
I've been brainstorming ideas for my campaign for Alexander the Great, and as rules continue to ferment away I've decided to take a pile of old models from various shoe-boxes around the house, loft & garage, and have a bit of a stock-take over a bottle of cheap beer: rather a good use of an evening, all things considered! 

First up, I discovered my ancient collection (probably from the 1990s) for DBA Macedonians and Persians, which I've also combined with a heap of further figures I got on a kickstarter several years ago and then never managed to do anything grander with; and lastly I have other DBA armies for Pyrrhus, which contain several elements that can be co-opted to serve as decent Macedonian troops.  Altogether, I believe the models are a mix of Irregular Miniatures, West Wind Miniatures, and Essex Minis.  Quality is wildly variable, but frankly the aim is progress, not perfection!

So, what do we have?


Well, a good starting point is the Pyrrhic army I got about 2 years ago for DBA.  This gives me a good core of painted Macedonian/Greek units.  Specifically, I get 1 Kn (Companions), 1 Cv (Thessalians) and 1 LH to straight away give me all the cavalry I need.  I also have 4 Pk elements and even a 1 Ps.


Next I have some spare Pk - specifically, 4 Pk bases from Irregular, of Pikemen at the attack with spears at 45degrees.  Additional good news on the pointy-sticks-are-good front, I have enough spare unpainted figures for 2 Pk extra should they be wanted.  These models are however not even base-coated,and I remember they didn't come with pikes - I had to hand-drill out holes to put plastic fibres inplace for the pikes, which is some thing I've never had to do before, and strikes me as very much something life's too short for.  Still, here I only have 8 models to fuss over.   


Also here are models for the 4Ax (Hypaspists), represented by no less than two elements I have of models - plus even some spare based as the lighter 3Ax element for when they fight more flexibly.  There's no Pk option for them, but I can easily use one base of Pk for them since I have no need for so many at the moment.  In addition to the above, I have 2 Ps bases, featuring slinger peasants with floppy wide-brimmed hats (bloody casuals...)


Lastly I have additional cavalry from the old Irregular models.  The figures are a bit squashed-looking and difficult to see detail on, but I believe I have a new element of Kn (Companions) to use, plus two elements of Cv (judging by the horse-hair plumes, beards and such, I guess they are Thracians?)


For the Persians, I have the following units of cavalry: I believe I have six Cv bases of generic Persian, Median and Bactrian cavalry.  I also have an element of very heavy cavalry, featuring scaled armour over the riders' legs and their horses - presumably these are Kn (Persian, Bactrian or Saka Heavy Cavalry).  I also have 5 LH elements, featuring a mix of javelin-armed Persians and more exotic bow-armed steppe-horsemen. 


Lastly for the Persian army's foot-sloggers, we have five 3Ax elements with huge rectangular shields - a quick Google search tells me these are likely Kardakes, so rebasing them as three 4Ax bases seems very likely.  I also have three 3Ax bases of Persians with the crescent-shaped shields, so these will fit nicely as Takabara infantry.  Best of all, I have 4 elements of Sp, representing Hoplites who can serve as the Greek Mercenaries.  I have also got a single 4Bw element to represent archers, even though they aren't available in the latest DBA army list.  Rounding this all out, I have two Ps elements of Persian slingers. 


Sunday, July 29, 2018

Campaign Ideas & Designs

I've been considering what to do for a campaign, which may actually get finished.   Long experience has taught me that planning a campaign, considering a campaign, and designing a campaign are without a doubt the surest ways to never actually play a campaign!  

As a result, this is something of a different approach from me, which I;ve decided to post on the blog.  I'll be attempting a campaign in small scale, aiming to get as much fun and drama out of as little book-keeping as possible, to let me play some small DBA games with a link between them.  

I've decided to go for Alexander the Great, for a combination of reasons - I have the memory of playing around with a primitive campaign of it I made myself about twenty-odd years ago, so there is a nostalgic value; I possess figures, mainly unpainted, which could be used; I have various books on it for inspiration, and I recently read and enjoyed the classic Mary Renault book 'The Persian Boy'.  

From this, I decided to design a campaign I could play easily to cover the Macedonian conquest of Asia.  Armed with lots of confused but eager thoughts, I decided to have a night of brainstorming my ideas - here's the result:


I sat down with a drink and nibbles at the dining room table, got a huge sheet of A2 paper, and basically spent an evening scribbling down every idea I could think of, all around a big node-to-node map of regions in the Persian Empire.  Practically all of them are uneven, and of uncertain use, they probably run counter to each other, and many will be simply incompatible, but: I have them written down to the stage where I can knock them into order.  

The aim is to produce a basic system for linking some DBA battles, to see if Alexander can conquer the Persian Empire, how far he can expand, and if he can establish a stable dynasty after he's gone or if the whole thing will collapse into fighting sub-kingdoms.  I've at least got my big themes for the campaign, and a notion of what I want to represent, even if I'm not quite sure how to do it.  Rather than stop here and forever ponder if a vague idea would ever be any good, I'm resolved to start playing it out as a test, and blog my thoughts about the results: bad ideas will get ditched or rewritten, and good ones will be kept and refined.  One way or another, the result will be that I get a campaign played out!  

Saturday, June 16, 2018

Back to the Wars...


Although this blog is intended to cover all sorts of war gaming stuff, if I had a 'great work' on the go, it would be my Wars of the Roses (WotR) campaign that I've been pursuing, on and off, for years.  (Just checked my old posts - since 2010, dear god!)  

I've been away from blogging, but not the hobby, for a year or two now - mostly down to real-life stuff, like having a family, getting in the way of things.  However, I'm determined to get my hobbying back on the go again, so this is part of my effort to make myself progress my campaign narrative onward.  

Last time I was gaming this, things had broadly reached an historical parallel: York had pursued the crown but died in the trying; his son Edward had taken up his claim, and won a massive victory at Baunton to sieze the throne.  It was the narrative equivalent of the battle of Towton in 1460, and brought things to a bit of a climax for a while.  

I dabbled in a side-narrative, pursuing the story of a minor noble who was involved in the local wars in the north, to keep myself busy.  However, he was inconveniently killed in a minor skirmish, and the whole thing rather lost momentum.  No problem however, as I had of course blogged all the results of my grand campaign, so I knew I could take it up again at some future date.  

So, We are now faced with an England under Edward IV, some time around 1465-1470.  Things are set for the tenuous Yorkist hold over the land to be tested once again, mainly because the previous battles had an unlucky habit of leaving a lot of powerful personalities still alive and making mischief, who historically had been killed off by this point.  Grudges need to be settled, so let's recap the main power-houses that have started to emerge up until now...  

YORK
The ruling dynasty, under King Edward IV.  Although notionally top of the pile, things are very worrying beneath the surface.  Many Lancastrian die-hards are still living in England, merely waiting for the chance to rebel and restore the house of Lancaster.  Edward relies on a network of close allies like his brother Gloucester, and Lord Hastings, to help him keep a lid on things.  In Edward's own mind, he fought to avenge himself on the Edmund Beaufort, the Duke of Somerset responsible for opposing his father, and succeeded in doing do when Edmund died at Baunton.  The wars are, to him, basically over.

LANCASTER
Henry VI, and more accurately his wife, have kept the opposition going in exile with French and Scottish backing.  Henry VI is in no fit state to rule, but his claim is still pursued and has many supporters.  He has an active and ambitious young son in Edward of Westminster, Prince of Wales.  He himself, in tow to his wife Margaret of Anjou, is in Scotland and poised to invade to stir up resistance.  Although his initial pool of supporters is small, he has potentially huge reserves across England and Wales, so if the queen manages to build up any momentum, it could all swiftly turn around for her family.  

BUCKINGHAM
The Duke of Buckingham has had a fine time in the wars.  Although his historical equivalent died at the Battle of Northampton, our re-fight version has kept going in the Lancastrian army up to Baunton.  He escaped from the resulting disaster and made it to France, where he notionally remains a supporter of Henry VI.  However, his success in the war can hardly have gone unnoticed, as the principal figure keeping the Lancastrian cause afloat, militarily speaking.  There is the serious chance that the Duke could wind up on the throne himself (he is a great-grandson of Edward III, after all) or at least the de-facto ruler in Henry's name.  

He's turned into a strange figure, old Buckingham: his men killed the Duke of York in battle, then he defeated Warwick at Gerrard's Cross to take London from the Yorkists, becoming one of the principal Lancastrian commanders alongside Edmund Beaufort.  At Baunton he fought well - practically the only Lancastrian to do so - and made it off the field with the biggest surviving chunk of the Lancastrian army.  Of course some might say his holding back in the early stages of the battle was what doomed his rival Edmund Beaufort and possibly lost the battle, but who can say for certain?  

WARWICK
The Earl of Warwick was a major figure in the historical wars, but in this re-fight he has been embarrassingly absent.  Rather than fight at places like Northampton, 2nd St Albans, and Towton, Warwick here has fought once at Gerrard's Cross, and was humiliatingly betrayed and routed for his trouble.  He fled to Calais, and thus missed the climactic battle at Baunton - although he doubtless feels the mercenaries he sent to assist Edward IV were crucial in securing the victory.  Now he's a man with something to prove, trying to get his diminished Neville family a bit of influence and credibility back.  Doubtless with the Yorkist regime being so frail, he is a critical supporter - but far from a reliable one.  His historical counterpart flipped between supporting Edward IV and Henry VI pretty much at will, and history seems set to repeat itself.

SOMERSET
A curious one here, more an individual curiosity over a faction: Edmund Beaufort, the great enemy of York, is dead at Baunton.  Now Henry Beaufort has inherited his title as the Duke of Somerset, and hasn't led Lancastrian armies in bloodthirsty victories yet - due to his fathers' protracted a-historical survival.  Now he is following the historical path set by the real Henry Beaufort, of submitting to Edward IV and apparently becoming a close companion.  The real Henry however couldn't live with his betrayal of the old king, and historically broke with Edward IV in 1464 and died at Hexham.  Our re-fight Henry is currently, nominally, a Yorkist favourite, but of course we know he's on a hair-trigger to defect to Lancaster under even the most long-odds conditions.  

So, how will these forces compete to try for the throne next?

Saturday, June 11, 2016

Pyrrhus vs Romans - DBA AAR

My first experimental battle with my DBA 3.0 armies: Pyrrhic vs Camillan Roman!

Rome went onto the attack, with Pyrrhus occupying a hilly & wooded region close to a small town - causing him some problems with his deployment.  His centre was blocked by the woods and so was occupied by the Auxiliary and Psiloi; his left saw the Phalanx deployed on a hill; while on the right his cavalry had to advance in a column to access the open plain in front.  

Rome deployed with the Principes and Triarii forming a 'hoplite' phalanx, the Hastati Blades on the flanks, and the Auxiliary & Cavalry in reserve.  

Pyrrhus advanced forward and deployed his cavalry, while bringing his phalanx forward on the opposite flank and threatening a pincer movement.  The Roman Consul sent his Psiloi off to screen the pikemen, and the rest of the line headed for the crossroads to engage the cavalry.  

In response, Pyrrhic Auxilia dashed out of the woods to try and drive off the Psiloi, with limited success.  The Roman line closed in on the Pyrrhic cavalry wing...


The Pike Phalanx, abandoning the slow-moving Elephants to press ahead, linked up with the Auxilia to push away the Psiloi with heavy losses - while Pyrrhus moved his cavalry to threaten a local outflanking on the end of the Roman line.  Rome, in response, split their line into two sections - with an impressive manoeuvre, their left engaged the Cavalry while he right portion of the line caught the Auxilia in the open and routed them.  The cavalry fight was a see-saw affair: The Latin Allied Cavalry swung out of reserve to counter the overlapping Pyrrhic Light Horse and rout them.  Pyrrhus was repulsed at the head of his Companion cavalry, while his Greek cavalry broke the Hastati opposite.  


Pyrrhus realised the climax of the battle was imminent, and threw his army forward in a last push - the Phalanx hit the Roman line with Hoplite Spears and Psiloi covering its flank, pushing into the Hastati and Psiloi, forcing them to give ground.  Rallying his cavalry and companions, he charged against the Roman Allied Cavalry and drove them back.  


The Roman army struggled to respond, merely pulling back the left infantry wing to confirm to the Allied Cavalry.  The battle raged on in the right, as the Phalanx pushed on against them and reserve Auxilia added support to the hard-pressed Hastati, enabling them to force back the Pikemen.  

Pyrrhus charged again at the Roman left - although his Greeks were driven back, Pyrrhus - with his own presence proving decisive, charged and broke the Principes.  Summoning up the Hoplites, Psiloi and belatedly bringing up the reserve Elephants, the main infantry lines clashed along their full lengths.  
The Pike phalanx was pushed back yet again by the Hastati, along with the Hoplites on their flank - the Psiloi fled back into the woods for protection.  


Rome pulled its Allied Cavalry back out of engagement range, while its remaining Triarii and Allied Auxilia engaged the Companions.  By the narrowest, Pyrrhus broke the Roman Triarii.  In the main battle-line, the Principes pressed ahead to keep pace with the Hastati, while the Auxilia and Psiloi engaged along with the Consul and the Roman Cavalry.  All along the line the Pyrrhic infantry started to give way, being forced to concede ground to the Roman attack.  


With this, the battle came to an end.  The Roman main line was steadily pushing the enemy back and gaining the advantage, but with the collapse of the left they were exposed to the charging Companion cavalry of Pyrrhus bursting into their left-rear.  The Roman army was defeated, and retreated off the field.  A hard-fought Pyrrhic victory then, as the Romans lost 4 elements to his 2.  The victory was close as the Romans seemed set to begin turning the flank of his infantry and ultimately rout the Pike Phalanx, while Pyrrhus had to personally risk himself in combat to gain a victory - in at least two 'quick kill' battles his '+1' modifier for the General's element proved crucial at either avoiding a defeat or tipping a draw into a victory.  


Saturday, May 28, 2016

Pyrrhic Army for DBA 3.0


Just a quick check-in to update what I've been up to: a Pyrrhic army for DBA 3.0

Saturday, June 6, 2015

Wars in the North

I've not been sticking too rigorously to my WOTR mini-campaign recently, which has rather discouraged me from posting about what I'm up to.  So, to fix the fact I've fallen rather behind: some updates!

A potential three-way battle on Potterburn was fought out between the Lancastrian Whitcaster, and the Yorkist Monkton.  Monkton had been besieging a local lord, when Whitcaster attacked him.  From rolling the setup, the result was actually a straight two-way fight: The besieged stayed holed-up, while Monkton took a hilltop position and Whitcaster attacked him head-on.

Monkton's defence proved alarmingly effective...

...while Whitcaster's advance was particularly shambolic!

Whitcaster, raging at his fleeing followers!
The result was a spectacular defeat for Whitcaster, losing him most of his strength and then both his vassals, who promptly ditched him and sought neutrality.  Harsh, but (un)fair!

On top of winning the battle, the Yorkists took extremely light losses, much to the fury of the local lord who was under siege - he had been counting on a bloody encounter leading to both the rivals retreating with losses, but instead they kept up the siege and he was forced to concede that maybe knuckling under to the triumphant Lord Monkton might be politic...

Following this fight, our own protagonist Lord Hadley had a date with destiny all of his own.  Invading the lands of the Lord Turston, a minor but relatively powerful figure.  Hadley split his own forces to try and lure Turston to battle, but sadly things didn't go too well!  

The initial line-up, with Hadley on the left
  
Turston advances, and Hadley's allies arrive right on queue!

Turston's levies surprisingly block the new arrivals, while the melee develops in the centre.

Hadley rolls a six, and gets himself killed right in the thick of the fight!
Yes, the perils of having a 'favoured' character in the campaign!  Hadley got himself cut down in the thick of the fighting, and his army routed.  Surprisingly, things recovered a little after this: both his vassals - Rosford & Leadbeck - proved loyal to the Yorkist cause, and his son took over smoothly.  Humphrey, the new Lord Hadley, is rolled up as 'bland' and 'depraved', as well as 'disliked'  Hm, at least he's half-competent in a fight - hopefully more than Dad was...


Saturday, April 11, 2015

28mm Republican Roman Army


Hi - I've been quiet here for a while, and thought I'd finally post some pics of what I've been busy with!  It's a Republican Roman Army (or 'Polybian Roman') for the Punic Wars, in 28mm!


15 bases of troops, all painted up - although I've still got the basing to do

All the figures are Victrix 28mm Romans, except for the commanders (Agema Miniatures) and the cavalry (unknown source, as I got them second-hand!)

The Hastati & Principes are the red-shields, the Triarii are blue, and all the Latin Allies are white

For months I've only seen them one or two units at a time, for painting.  They certainly look like a fearsome mob when all set out together!  

Hopefully a bit of a better close-up on some of the infantry types

A group-photo of the Consul Maximus Mendacious, along with some of his Tribunes