The armies themselves can be put on the tabletop in either 2mm or 15mm form, but as I've just finished painting up two 15mm DBA-style armies, I'll probably be using them the most. The Strategic game 'A House Divided' rules uses counters to represent a significant body of troops, presumably about 10,000+ men per counter (no definition better than this is given, so we'll just play along.) They can be militia, regulars, or crack troops. At first, absolutely everyone is militia, so as we're all in the same boat no greater distinction is needed just yet! As the war progresses, training and combat-experience will steadily turn our volunteers into hard-bitten veterans!
First, the forces of Union! Using the DBA 1500+ expansion rules and army lists, I've assembled what will be my fundamental Union force:

The massive majority is Rifles (Rf), who are ten of the twelve bases. The remaining two are the Cannon (Cn), and the dragoon cavalry (Dr). I did this primarily because I wanted to have the Union to be pretty infantry-heavy, so the boys in blue wouldn't very often find themselves outnumbered other than locally. I had to have artillery of course, plus some cavalry force, however inadequate, for scouting work. The full list is: 10xRf, 1xCn, 1xDr.
Next up, the Rebs:
Defined mainly by the Union force, I found myself getting basically the same army for the south (the army lists are too flexible and you can form whatever force you like) and then adapting it to get the numbers of infantry down. 7 bases are the ubiquitous Rifles, plus a single Cannon again. I gave the army two cavalry bases so they could have an 'edge' tactically over their rivals (as was historically the case.) The final two were a troop type wholly absent in the Union army, light infantry classed as Jagers (Jg). These would represent lighter concentrations of troops that could support the friendly Rifle bases, and pin down enemy ones. Quite a good way to represent a smaller Rebel force confusing and distracting a more tactically clumsier Union rival, as was so regularly the case - especially in the earlier part of the war. Full list is: 7xRf, 2xJg, 2xDr, 1xCn.
So, let's prepare for some fighting! Here's a close-up of the Central Belt, which you can no doubt view on any internet map site. I've marked up the one below to show the situation.

The rebel forces are mainly around Stirling, with a smaller force in the west around Dumbarton. They're linked by the Forth valley, which runs between them and to the north of the large range of hills in the middle. These hills are the Campsies, and although they block any Union movement, the Rebel forces are too far apart from each other to be mutually supportive. In other words, if one gets attacked, it's on it's own and won't get any help from the other until it's all over!
Not that attack is particularly likely anytime soon. The Union forces are typically scattered, but for a massive concentration is located on the critical city of Glasgow. No real move north to Stirling is possible in strength until this city is 100% safe against a rapid descent by the rebel force at Dumbarton. Consequently, the opening Union moves in the war are decidedly meek. Work begins on fortifying Glasgow, to protect it's garrison. A small component of this force is sent north to Kilsyth, in order to secure North Lanarkshire and prepare the way for a stronger advance later (it keeps those 'On to Glenrothes!' boys in the newspapers happy...)
However, Rebel hopes of success will not be met by sitting passively back, especially when the chance of a bold stroke is there! The chance to establish an inferiority complex and upset the Union in their heartland is too good to pass up! Half of the Rebel force in Stirling is kept in place to prevent it being taken, while the other half strikes at the 2PP town of Falkirk, aiming to wreck the Union force in the area and cut one of the most direct links between Glasgow and Edinburgh. The Union force moving forward at Kilsyth will be of no support, as to come to Falkirk's aid would mean moving away from supporting Glasgow. The meddling politicians in the Capital would never allow it! Looks like we have a straight one-to-one fight coming up, on the banks of the small river Carron, to open the war.
 Here's the full crowd so far of ten bases plus a commander. (There's no overall scheme, I'm just painting them as the mood comes to me!)
 The rank-and-file, Retainer Longbowmen. I've painted one set plain red, and another blue-and-white. I'm not basing it strictly historically, just on what looks decent and plausible!
 The General, plus bodyguard and herald, mounted on a 2p coin. Retinue Billmen in the background.
 Men At Arms - possibly the fastest to paint, thanks to the 'white' armour with no heraldic colours on them! Makes them look far more scarily business-like, I think. No banners are made yet, but that's my next task.
 Mounted knights. I bought these mainly to give me the option of later-HYW battles, plus in my fictional Lavancia campaign things will have a HYW-WOTR flavour, and there's always space for some hard-charging cavalry in any army of mine!
 Finally, a close-up of the billmen. Second-most numerous troops on the field, being outnumbered by Longbowmen roughly 2:1.

 And here it is, drawn on an 8x8 grid! In terms of accuracy to reality, I'd say the map is 10% Reality and 90% Fantasy, but that's all that's needed! I've used the actual town names, placed them relative to each other, and drawn the only significant physical feature, the river Carron, on quite accurately. The road network, woods, hills, and railways are all invented. Pretty much the only modifications for 'reality' came when I looked up some towns on wikipedia and learned some minor fact, but adding in anything like this is pure whimsy - just for the fun of it! It's also worth pointing out that certain thudding inaccuracies will simply be ignored. Stirling, for example, will be mysteriously going without a medieval castle over it's town centre, as 19th Century America tended not to have too many of these!


 Union troops come rushing up at speed, but the rebel cavalry has potentially turned the flank of the Union line.
 The firing breaks out, and each side loses about half it's force as the militias collapse into helpless disorder. Fighting for the rebels goes best nearest the river.
 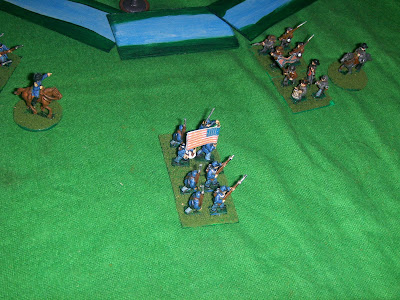 The rebels press on, turning to outflank the enemy line...
 In the nick of time, Union reinforcement divisions arrive on the scene. The grey cavalry are scattered and the infantry sent reeling back on their own reinforcements.
 The hesitating unionists are delayed by small skirmishing groups of Rebels while the remaining infantry form up.
  The reformed battle-lines clash...
 Taking losses, the union keeps it's line straight by giving ground to the screaming rebels.
 Disaster for their morale as casualties mount, including the Northern General Wilcox.
 The union line is as bent as a snake-rail fence, but can the last division out on the flank save the day?
  With a crisis at all points on the line, the reinforcing division sends it's brigades in all directions to try and staunch the flow of troops rearward. It quickly descends into chaos.
  Giving the rebel yell, the grey troops are only barely held back by artillery fire point-blank.
  Once again the rebels turn the flank by the river, leaving the cannon dangerously exposed, and the disarrayed infantry are in no state to reform.
  The exhausted Union troops flee to the rear, leaving the field to the exultant Confederates!


